Monday, September 15, 2014

Review: Loreal Paris White Perfect "Micro Vibration 3 in 1 EyeBrightener"

I have very dark circles under my eyes. I don't know why but this happened when I started college at the age of 18 or 19. I don't know why, well, I mean there are lots of reason, though. I stayed late quite often, and I have anemia, and I wear super thick glasses because my myopia is very high, and... What else could it be?

Oh well, whatever. So, ever since I had enough money to buy things other than my lunch and Sailormoon collectible cards (LOL), that's when I received my first paycheck, I started buying eye creams. (Yes! Eye creams, not ice creams!). I tried some brands like Oriflame, Clinique, Ovale, Garnier, The Body Shop, even the super expensive (according to me) Artistry. Result? Nah... Even just a slight progress? Nah...

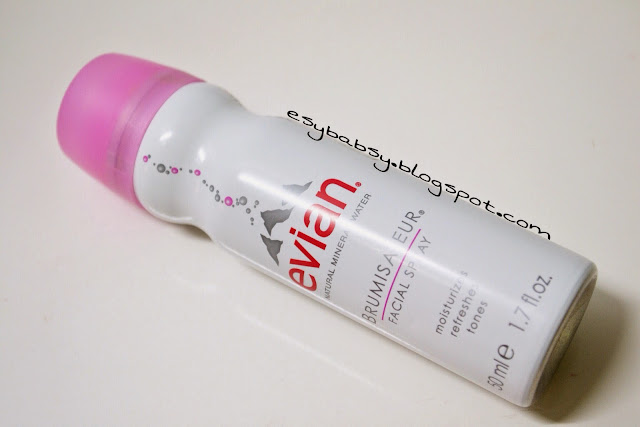
Then I was desperate and stopped buying eye creams, and just covered them with bright eye concealer that sometimes make me look like a white-eyed raccoon, but then again, I thought, I'm getting older. I don't wanna look old! So, out of desperation, I found this in Carrefour while doing my grocery shopping. And, I bought this randomly, not because I had some good reviews before. (baca: nekat saking putus asa).

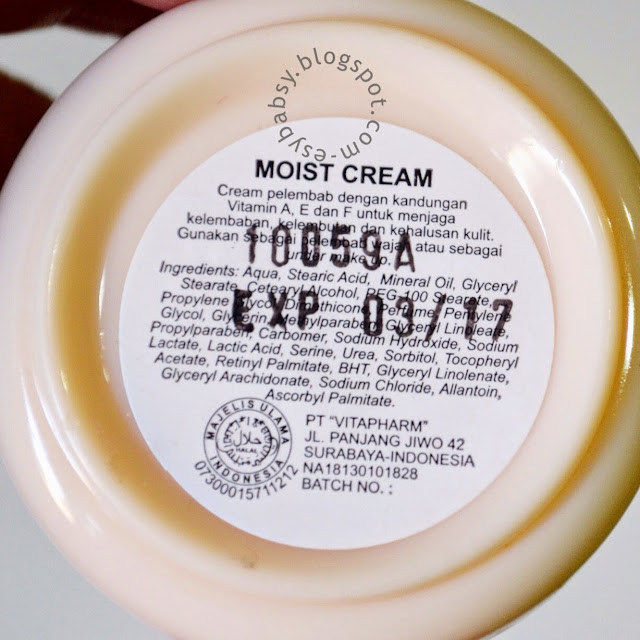
I was kinda attracted to the word Micro-Vibration. So I thought, it has a massager inside it. Quite interesting. By the way, parabens in the ingredients?
 
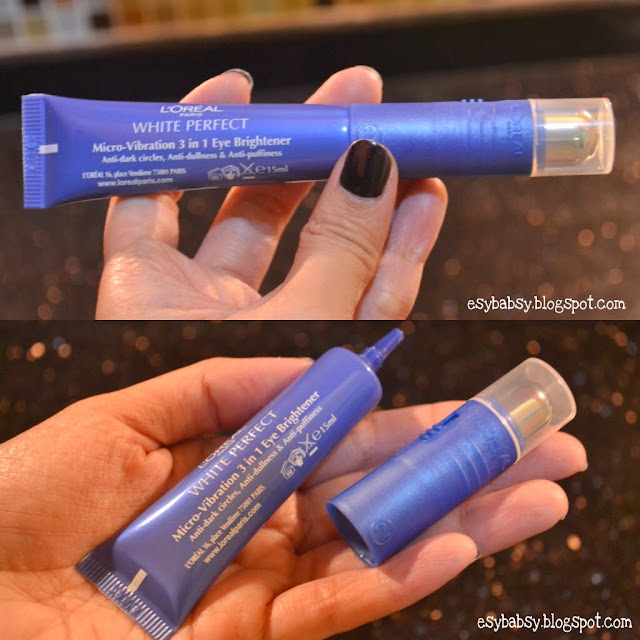
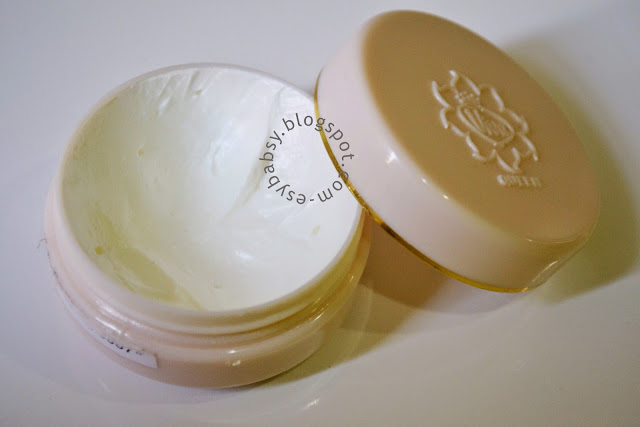
The product packed in a smooth denim blue plastic. It actually has two parts: the eye creams itself, and the massager.
 
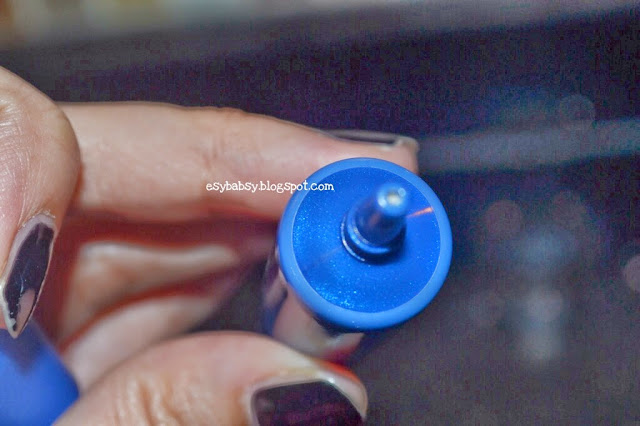
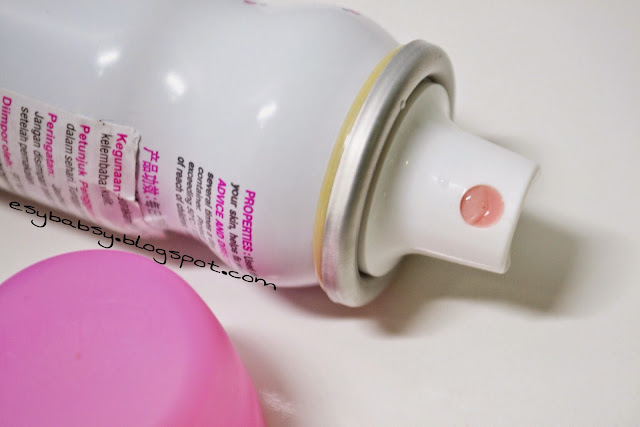
This tiny hole is where the creams comes out.
 
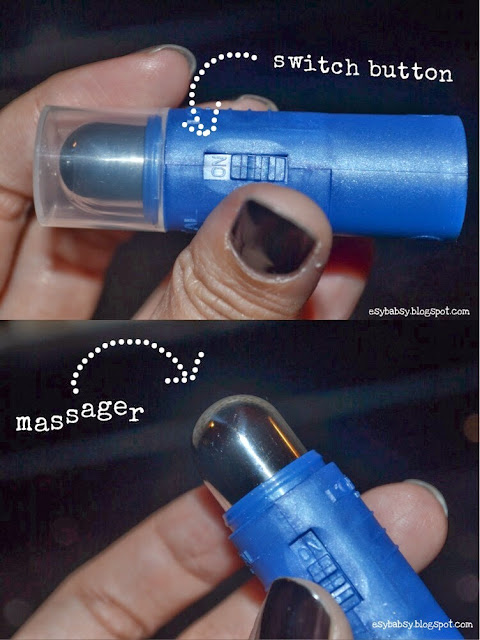
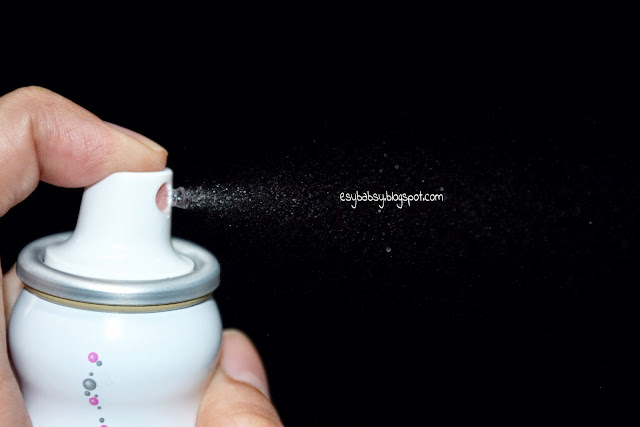
The massager with closer look. The tip is made of metal that felt cool when it touched your eye bags. It has a switch button to turn it on. This micro massager, I think, is better than a roll-on type since it kinda hurts my eyebags.
 
 
Maybe you'll question about the battery to operate the massager. Well, good news: the battery was included. Bad news: the battery was installed. Yes! Installed inside the cap and there's no opening to it. In other words, there's no way you can use this once the battery is run out, or the cream runs out, or whichever comes first. So you cannot cheat. Damn smart manufacturer. Damn you.
 
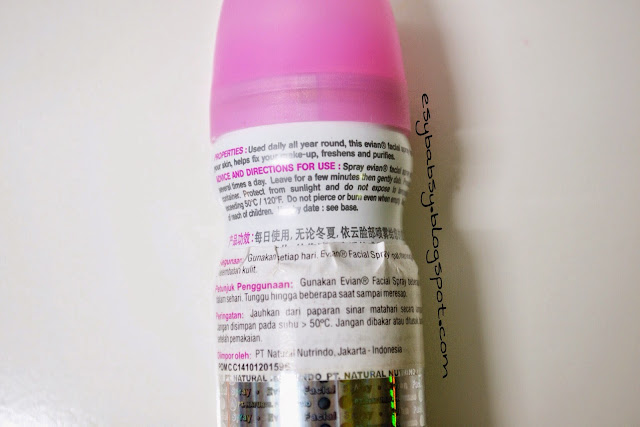
This is the directions of use and the precautions. This is extremely important to achieve the maximum result. I will strongly suggest you to read the instructions carefully before using this since there are some conditions which are very harmful if you use this in the wrong way.
 
By the way, just don't massage your upper eyelids, please. And, don't forget to clean the massager afterwrds. I just wipe it with wet tissue and dry it with dry tissue.


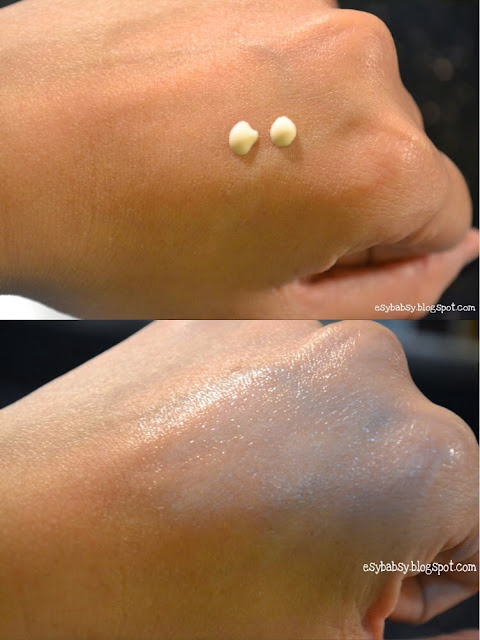
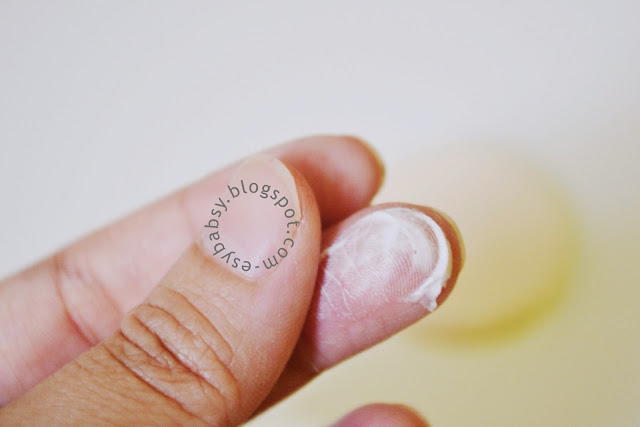
The cream is odorless and very light. I only need very small amount for the whole eye area. Don't squeeze too hard, will ya? I did that the first time and wasted a large amount of product :( By the way, the cream doesn't sting my eyes.
 
Does this cream works for me? Well, hell yeah! I haven't even finished one tube and the area under my eye appears lighter than usual. In most of the times, I don't even have to bother applying concealer stick anymore since one layer of pressed powder is enough (I don't use BB cream or foundation often). Of course, my raccoon eyes are not completely recovered, they just appear much more lighter. Only babies who don't have dark circles.

Too bad I didn't take photos for samples since I kinda belittled this affordable product at first. But don't worry, I asked my most honest reviewer of all times: my husband, he completely agreed. LOL. I apply this after dabbing my Secret Key Starting Treatment Essence before going to sleep every night. I have to tell you that I still stay late quite often and drank cups and cups of coffee. If only I kept my healthy balanced life, I'm pretty sure this product would have more amazing effect.

Verdicts:
  • Light creamy texture
  • Odorless
  • Does not sting your eyes
  • Nice packaging
  • Micro massager is a good invention tool (better than roll-on massager since it kinda hurts)
  • Battery is installed in the massager
  • Really brighten up my eyes, at least for me
  • Brightening effect may lessen if you don't use this regularly
  • Reasonable price: around IDR 160K (USD 16)
  • Where to get? Drugstores, supermarkets, or any official Loreal counters. (I found this in Carrefour)


Thank you for reading. Hope this is useful :) 
Until then!


Review: Evian Brumisateur Facial Spray

I've seen this product many times on drugstores and supermarkets, but I thought it was some edible product and wonder why such product comes in a spray can and expensive price. Stupid, huh? Until some friend told me how this worked on her as a setting spray as well as making her face look matte the whole day.


The spray comes in a handy white spray can with matte transparent pink cap. There are three sizes available: 50 ml, 150 ml, and 300 ml. Each size comes in slightly different can design. I purchased the smallest one for trial purpose.


What it claims:
 
Natural Hydration
The exquisitely fine mist produced by evian® Brumisateur® penetrates and rehydrates the upper layers of the skin. evian® water has a unique mineral balance along with exceptional purity which suits all skin types, even the most sensitive. Leaves skin looking healthy and feeling refreshed. Dermatologically tested.
 
Beauty
A light misting sets and revives cosmetic colors throughout the day. This allows the skin to be re-hydrated several times without removing makeup. And this is why evian® Facial Spray helps improve the performance of all color cosmetics. Many make-up professionals prefer evian® Spray to dilute and blend make-up.
 
Baby
Perfect for gently cleansing baby’s sensitive skin (bottom, face and hands), with or without cotton pads. The leak-proof canister is suitable for the nursery or diaper bag! Babies love the fine cooling mist of hypoallergenic, pH neutral evian® Facial Spray. Tested under pediatric control, and used in maternity hospitals.


Judging from the ingredients, it's just plain water.


How to use:
Just spray it, but for a reason I just don't push the spray to its maximum since there'll be too much product waste.
 
***
 
I simply love this. From curiousity to one of must have item in my drawer, even in my makeup bag. After washing my face I would spray a small amount onto the whole face (my face felt smooth and fresh instantly!), and wait until it completely dries, and began my skin care and makeup routine. And that small additional' routine helps my makeup stay in place and reduce the oily face appearance, even when I wear makeup products that tend to make your face more greasy. From what I read on the can, you are suggested spray, and wait for several minutes, and gently dab your face with tissue, which I prefer not to. Because I thought it'll be a waste of product, so I'll just wait patiently until it completely dries.
 
I also spray enough amount onto my foundation or kabuki/powder brush before blending the foundation or face powder and the result was better compared to when I use dry brushes.
 
From several reviews I read and watched, this also works as a setting spray. Just spray some amount after you put your whole makeup on. I did this a couple of times and the result was great, but please becareful because not all of makeup product can be treated this way. I once sprayed this after Maybelline Clear Smooth Cake Powder application and the result was amazing, but different thing happened to when I wore Viva Compact Powder since the product made my face powder clump on several places. Talk about looking ugly, duh? I don't know what specs can help you differentiate which product works well with this, and which doesn't, so I prefer not to spray this after makeup application.
 
***
 
Overall:
Great one for those who looks for a multi purpose product with reasonable price.
 
Price:
IDR 70K something. I forgot as usual. Or USD 7 on its official web. I bought this on Guardian drugstore.


Sunday, September 14, 2014

Review: Viva Queen Moist Cream

Kenikmatan hidup itu adalah seswatuh yang bisa mengurangi masalah dalam hidup dan meringankan beban pikiran kita, wujudnya bisa dalam banyak hal. Tergantung kamu menyadarinya apa ngga. Bisa dari tukang sampah yang rajin dateng tiap hari sehingga halaman depan rumah bersih terus dan nggak dilalerin, atau mini market yang letaknya di sebelah rumah persis jadi kalo mau beli keperluan sehari-hari cukup meluncur keluar pake daster dan sendal jepit, atau biarpin makan porsi kuli tetep aja berat badan nggak naek-naek (yang ini bukan gue, jelas...). Banyak lah ya. Kalo satu kenikmatan yang musti aku syukurin adalah kulitku yang murahan. Maksudnya pake produk yang dijual murah* di warung cocok-cocok aja, gak gampang break out. Asal rutin dibersihin dan dirawat, dijamin 'aman'. Ibarat roti, ditaburin meses Ceres lokal rasanya tetep enak, gak perlu pake Nutella. Hahahah!
 
*murah: murah bukan berarti produk gajebo yang harganya selangit dengan kualitas murahan loh
 
Jadiii setelah pelembab Wardah-ku habis (review di sini), aku langsung seneng, berarti ada alesan belanja pelembab baru. Males lah beli Wardah lagi, bukannya karena nggak cocok, tapi pengen aja nyoba yang baru. Terus ceritanya waktu lagi ke pasar, aku nemu pelembabnya Viva ini. Rada jiper sih mau make, soalnya pas pake Milk Cleanser-nya aku suka berasa perih, walaupun gak jerawatan juga. Tapi yah, coba aja lah. Harga juga cuma 8000-an. Lupa tepatnya.


Kemasannya yang imut-imut jadi alasan kenapa aku mau beli ini. Gak banyak sih yang bisa dijelasin dari kemasannya, bentuknya jar warna putih patah, pake tutup puter. Udah. Isinya cuma 22 gram. Eh, aku bilangin ya, ada beberapa produk Viva yang kemasannya sama persis kayak gini, bedanya cuma di stiker depannya aja. Jadi jangan sampe ketuker ye.


Kalo dilihat dari deskripsinya, produk ini bisa dipake sebagai pelembab biasa, atau sebagai under makeup. Apaan ya under makeup itu? Mungkin seperti face primer kah? Well, anyway, aku sih gak pernah make ini buat macem-macem selaen pelembab.


Wujud krimnya itu krim yang padat tapi bertekstur lembut, kayak mentega. Kalo dibalik gak tumpah. Warnanya putih dan kalo dilihat dibawah sinar matahari agak terlihat mengkilat. Kenapa ya mengkilat? Kalo ngomongin soal baunya, ya gitu deh, tau sendiri Viva, kembang setaman mekar mewangi banget. Rada ganggu sebenernya, cuman cuek aja lah, toh baunya akan menghilang lama kelamaan. Oh ya, isi krimnya itu sebenernya penuh loh, yang aku foto ini udah aku towel beberapa kali :)


Krim model begini mengingatkan aku sama krimnya Hazeline Snow jaman dulu banget. Aku pake sedikit aja udah bisa cover seluruh muka, jadi biarpin dikit yaaaa produk ini a little goes a long the way lah. So isinya yang cuma 22 gram itu sepertinya awet buat sebulan kalo dipake tiap hari.


Pas dipake ke kulit rasanya semriwing dan adem banget, beneran jadi lembab deh, dan karena dia berbentuk padat, juga meresap cepat ke kulit. Nggak kayak pelembab Wardah-ku sebelumnya. Pokoknya dioles langsung meresap dan nggak perlu nunggu-nunggu lagi buat langsung lenongan. Tapi membaurnya harus rata ya, kalo nggak nanti suka ada putih-putih ketinggalan di muka mu, hahahah. Makanya make ginian harus sambil ngaca XD.
 
Sayangnya pas setelah sekitar 2 jam aku pake ini, muka langsung berasa minyakan. Waktu itu aku cuma pake pelembab ini, plus di set sama BB Cream dan compact powder. Well, bukan kilang minyak banget sih karena mukaku tipe normal-oily, tapi kalo wajahmu yang minyakan banget, mungkin kamu bakal ngerasa pelembab ini kaga banget ya.
 
Overall, dari lembabnya sih aku ngerasa produk ini enak banget, apalagi kalo dipake abis mandi pas muka lagi keset-kesetnya. Tapi kalo dari efek minyakannya itu, aku ngerasa salah beli. Kayaknya harus coba pelembab yang seri green tea-nya deh. Ntar kalo udah nyoba yang itu aku review lagi deh. Tapi ntar, kalo yang ini udah abis.
 
Kesimpulannya:
  • Krimnya padat dan soft
  • Rasanya adem di muka
  • Melembabkan? Iya
  • Tapi hasilnya jadi minyakan di aku
  • Cepat meresap
  • Awet, isinya bisa buat sebulan
  • Wangi kembang surga setaman
  • Murmer, cuma IDR 8 ribuan


Tuesday, September 9, 2014

Review: Revlon Wet/Dry Eyeshadow (Raisin Rage)

Produk yg mau aku ripiu kali ini adalah esedo Revlon. Bukan merk lokal tapi lagi males aja pake basa Inggris. Karna kalo bukan pake 'basa ibu' itu mikirnya dua kali. Nulis plus mikir basa Inggrisnya apaan, iya gak sih. Berhubung ini otak lagi dong-dong, yahudahlah...
 
Karena beauty box-ku sudah dipenuhi oleh esedo berwarna ceria (baca: warna gila), jadi ceritanya aku mau agak-agak menyentuh bumi dikit. Kebelilah ini esedo yang warnanya amat sangat au naturel sekali, pake banget juga... Nggak beli juga sih, karena ini gratisan setelah belanja berapaaa gitu di apotik Watsons. Itung-itung, lumayan lah. Kan ceritanya eke belom pernah nyoba esedo Revlon.


Kemasannya kayak Hamutaro-kun, imut-imut. Paling selebar telapak tangan. Tutupnya juga transparan, jadi keliatan isi dalemnya. Sayangnya no mirror bo. Tapi tutup plastiknya itu lumayan tebel loh, kokoh lah keliatannya.


Kalo dilihat dari deskripsi nama dan petunjuknya sih, esedo ini bisa dipake basah dan kering. Kalo mau lebih intens warnanya, cukup basahkan sponge-nya. Walau menurutku agak absurd juga sih... kan semua esedo bisa dipake basah, tinggal korek aja pake sponge basah. Bahkan semua esedo itu bisa dibuat lipstik.


Teksutrnya sih nggak berbubuk, tapi kok ya keras banget. Kurang empuk gitu pas dicolek. Masih empukan esedonya Sariayu.


Yang jadi pertanyaan aku waktu liat aplikatornya, et dah kenape penyet gini bentuknya? Soalnya kalo buka ripiu blogger lain, bentuknya oval. Apa karena kegencet kali ya. Tapi kebetulan juga sih, jadi ujungnya yang penyet itu bisa aku pake buat warnain bagian outter V. Sebenernya seperti kebanyakan aplikator, ini emang seadanya. Tapi emang kemasannya praktis banget, males deh mau bawa kuas lagi kemana-mana. Lagian aplikator kayak gini tinggal beli aja kalo udah gak bagus lagi, banyak dimana-mana.


Swatch-nya sekilas di jariku kayak gini. Yang satu coklat gelap (meski gak terlalu gelap), yang satunya warna kulit. Bahasa kerennya 'fleshtone'.


Kalo ngomongin soal pigmentasi, ah nggak banget deh. Kayaknya aku udah usek beberapa kali tapi jadinya tetep aja tipis begitu. Setelah dikasi NYX Eyeshadow Base (White Matte) agak lumayan membantu sih, tapi yah tetep kurang menurutku.
 
***
 
Rasanya takkan lengkap sebuah repiu esedo tanpa kehadiran EOTD. Daaaan karena aku lagi rajin juga, sempet juga kubuat pictorialnya, yay! Sedikit catetan ya, di EOTD ini aku make esedonya dengan aplikator bawaannya itu, sekedar menguji performanya. Hehehe...

 
  1. Setelah merapikan alis, beri eye primer di seluruh kelopak mata.
  2. Apply warna fleshtone di seluruh kelopak mata hingga melewati bagian lipatan mata. Baurkan.
  3. Apply warna coklat tua hanya di kelopak mata bagian atas. Baurkan.
  4. Apply warna coklat tua di kelopak mata bagian bawah.
  5. Bingkai matamu dengan eyeliner hitam di atas dan bawah mata.
  6. Hihlight bagian dalam bawah mata dengan eyeliner atau eyeshadow putih/silver.
  7. Kamu bisa tambahkan bulu mata palsu atau maskara kalo mau.
Sedikit tips, riasan mata ini bisa banget dibuat jadi lebih natural lagi. Untuk step No. 5 kamu cukup membingkai matamu dengan eyeliner di bagian atas mata saja, udah berenti di situ, ga usah diterusin lagi kalo menurutmu udah agak lebay. Bentuk eyelinernya juga bisa dipendekin dikit, ga usah sepanjang itu.
 
Jadinya seperti ini, dilihat dari beberapa sudut:
 
Jadinya natural banget ya. Di foto hampir gak keliatan, serasa gak pake esedo, dalam 'kehidupan nyata' esedo ini juga nggak terlalu nyala. Padahal sponge bawaannya itu udah aku usek-usek banget loh di pan-nya.
 
Menurutku sih produk dengan warna seperti ini cocok banget buat yang:
  • Nggak terlalu suka riasan menonjol.
  • Baru belajar dandan dan masih malu-malu tengsin buat makeup-in mata.
  • Buat anak sekolahan yang pengen dandan buat hangout (bukan buat sekolah ya).
  • Anak kuliahan yang sebenernya berjiwa lenong banget tapi nggak mau kemenoran karena takut di-bully senior atau disinisin ama dosen yang punya anggapan mahasiswi kece itu pasti lenjeh, ganjen, males, kerjaannya dugem mulu, nggak pernah belajar.
  • Orang kantoran yang napsu dandan tapi peraturan kantor gak boleh dandan selaen pake warna netral, terus kalo cakep dikit bisa disirikin sama yang udah tua senior, terus dicap sok pamer, dibilang beli kosmetik ngabisin duit suami doang.
  • Atau... ya udah udah udah... ngelantur, maap jadi emosi dikit. Hahahah...
Balik ke topik...
 
Ketahanan esedo ini aku bilang lumayan ya untuk harganya, nggak mengecewakan deh. Tapi dengan catetan, aku baru pake ini buat ke tempat-tempat non-hardcore. Entah gimana jadinya kalo kamu pake buat outdoor atau berenang, kayaknya sih nggak bakal tahan diliat dari harganya. Paling banter aku cuma pake buat wudhu, dan luntur tapi dikit. Mungkin harus pake primer yang lebih nampol lagi biar hasilnya lebih pol.
 
Oke mari kita rangkum:
  • Medium to low pigmentation.
  • Very natural shade, tidak cocok buat yang berjiwa banci tampil
  • Medium staying power.
  • Travel friendly packaging.
  • Great for daily use.
  • How much: IDR40-50K (I forgot), but not more than IDR 50K (USD 4).


Review: Etude Color Lips-Fit Lock 'N 'Summer #OR203 Live Fit Orange

This is one of the newest of several new items that was launched by Etude House. Confused with my statement? Well, don't be. Because EH continuously launches new product like in every second before I can grab their latest one yet. Able to make me poor.

The product I'm gonna be reviewing now is from their Lock 'n Summer collection, Color Lips Fit. This is the continuation of their previous Color Lips Fit launched several months ago. I've reviewed it already, you can check it out here.


Compared to their ancestors Color Lips-Fit which looked pretty and sweet, this Lock 'N Summer series has slightly different box and bottle design. More lively and fresh, although I don't capture the 'summer' look on its design. More like a Union Jack, isn't it?


The color system. 
Somehow, not all colors are suitable for summer, don't you think? It should have come in a more playful system. But that's ok, they're gorgeous anyway.


My shade is OR203 or Live Fit Orange. Of all three shades of oranges, this is the brightest one.


Directions of use:
  1. Shake well before use.
  2. Apply smoothly with tip. Lightly dab onto center of lips for gradation. Delicately apply for full cover.
  3. Apply a layer of Color Lips Fit WH901* after color for moist gloss.

*WH901 is a clear Color Lips-Fit range.


The applicator is a bit round, bended, and pointy. It is also bendable if you push it. I use the tip to draw the outter lips to create a neat and precise result.

***

SWATCHES


The swatches when feshly applied, still look glossy and wet.


After a minute or so, it will turn to matte. When I say matte, it is very matte. It sinks into your skin just like that. 

Btw, what is the best word for describing this shade? Well, if you see the bottle you might first mistake it to red or coral red, but once you swatch the consistency, you know they aren't. This shade is what I would call a true daring orange.


Bare lips.

And...

The swatches on my lips:


I apply this using gradient style and full lips. For gradient style I just dab a very very tiny amount on the inner lips (which make me ticklish!) and spread it with my finger onto the whole lips.

***

Btw, lately I just remembered that we can apply this as blusher as well. I should have told you on my previous post about it but I forgot.


To apply as blusher, I just need a very small amount like this.


Then... Blend it with your hand, like this. I took this picture under indoor lighting with camera flash.


And, this is how it'll look like under natural lighting.

Although the color looks pretty on my lips, I would rather not use this as blusher because it look weird on me, LOLs. Orange cheeks? Oh, c'mon! But, IDK, maybe I'm not used to this color on my cheeks just yet. Instead, I would rather use no blusher at all.

***

Once the liquid sunk into your lips and met its final matte result, you will fill the light powdery sensation on your lips, which is for me is not very disturbing. Unlike my previous Color Lips Fit shade which look too bright and COMICAL on me (a.k.a. weird), this shade just compliments my whole appearance.

Lately I also learn that any Color Lips Fit series will only dry your lips if yours are in bad condition. I use this alone without lip balm application in advance and my lips end up just fine although it's very matte. So, take care of your lips ya. Don't blame the product if you get chapped lips. LOLs.

This one also stain my lips and doens't easily transfer unless you kiss someone or something deliberately. But sadly I gotta say that the staying power is not very good. I used to eat while wearing this and the whole color just dissappeared except for the outter one, made me look as if I was wearing an orange lip liner. Totally ugly, LOLs. But reapplying it wouldn't be a problem since this one doesn't clump.


Judgement:
  • Unusually pretty bright orange
  • Matte and powdery result
  • Doesn't clump
  • Not drying
  • Not easily transfer
  • Lip stainning afterwards
  • Medium staying power, but easily dissappeared if I use this to eat
  • How much: Ranging from IDR 100K to 120K. 

Last word?
Totally adore this!


Monday, September 8, 2014

Review: NYX Eyebrow Gel (Brunette/EBG 03) with Mashami Shouko Brush #307

When I first knew that my favorite line, NYX, launched their very first eyebrow gel, I just couldn't wait to get my hands on this.


The product was infused in a tiny transparent vynil tube, comes with a box as well.


There are five shades available: Blonde, Chocolate, Brunette, Espresso, and Black. The shade I chose was Brunette

Actually I was a bit confused to choose between Chocolate or Brunette. The seller suggested Chocolate for a more suitable shade for Indonesian skin tone. But after googling some beauty blogs and Youtube channels, turned out that Chocolate has a more reddish brown, almost the same with my Silky Girl Eyebrow Pencil, while Brunette is more greyish undertoned. So why should I bother purchasing the shade I already have? 

I also aim for the Blonde one, but haven't dared to purchased it yet.


This product is actually very tiny, only 10ml. It has a small pointy hole and a tiny black cap, which is a bit unpractical. Just like my OCC Lip Tar that has a very mini cap, I fear that I might lost the cap. Sheesh... Btw, I must warn you, that the consistency is runny, so don't squeeze too hard ya, or you'll waste some. 


***

SWATCHES


So here are the swatches on my hand.

  1. The very first strokes I squeezed freshly from the tube. It looked brown with grey undertone. 
  2. This is the last strokes I made from the remaining gel on my finger. Somehow the shade turned to a reddish brown, similar to the Chocolate shade.


I only need a very small dot to draw those two lines, a very little goes a long, long way. It will be ages before it run out completely. And judging from these swatches, the color also buildable, depends on how thick the strokes you draw.


From the reviews I found on the internet, all of them would suggest applying ths with an angled brush. Unfortunately, I don't even have a good one because the tip is not pointy enough (fyi, kuas angle-ku abal2 heheh). So this is the only brush in my purse that matches this eyebrow gel. It is flat instead of angled, but has very pointy and a bit hard tip for a more precise line. This brush also good for smudging the gel on the inner eyebrows.

I used to regret buying this brush since I just didn't what to do with it, now I feel lucky having it.


***

I actually have several ways to draw my eyebrow, but using this eyebrow gel, I use the common method.


Frist of all, I would gently squeeze a small amount of the product onto the back of my hand like the picture above. You only need that small amount to draw both of your eyebrows. For me sometimes, I need even lesser amount.


  1. Brush your eyebrows with a clean eyebrow brush. Some would prefer using brow wax or clear mascara for a more trimmed look, but I don't do that. (Blogger yang ngasal. Hahaha).
  2. With your favorite brush, draw the lower part of your eyebrows.
  3. Do the same thing with your upper eyebrow.
  4. Fill in the blank area.
  5. Using the leftover product, smudge it to make a gradient effect on the inner part of your eyebrow. You also can do this using the back of your brush.


One of my FOTD using this product on the eyebrows. I do love the shade and the result. Although it's darker than my Silky Girl Eyebrow Pencil, but still look wearable for daily use. At least my eyebrows aren't looked too red nor too dark.


***

This is the very first product ever in my entire life that fulfill its promise to be a waterproof and smudgeproof one. I wear it in a hot and humid climate in outdoor activity (Bekasi, bo...), used to take a nap with this, and still no discernible fading.

Due to that, the gel also dried very fast once you squeeze it out of the tube. So, one tip when drawing your eyebrows with this, is just do it fast. Don't think too much! That's why some people prefer not to squeeze the product onto the back of their hands since it'll be anightmare to clean up. But, I just can't find a more hygienic way other than that. I mean, I always wash my hands in advance.

And just like I said before, a little dot goes a very long way. So be gentle with your brush or you'll end up overdoing it.

Last word, this product is ridiculously awesome, I like it! However, I must say that you might not like this if you are still a beginner on drawing your eyebrows. Well, I'm not saying that I am a pro already, totally not, but applying this product is waaay more tricky than using a regular eyebrow pencil, although the final result you get is to die for.


Verdicts:
  • A little goes a long the way
  • Waterproof and smudgeproof
  • Brunette is a brown with grey undertone
  • Buildable result
  • The gel quickly dry
  • How much: USD 6.99 on their official website. But available in online store for about IDR 100-120K, depends on the seller. However, I am not sure whether these also available in  Indoneian official counters just yet.

Tanks for reading. I hope this review is resourceful!


Latest Post

First Impression: Evershine Moringa Series